
Creating and using sequences
A sequence is an automated series of actions (emails and tasks) that guides a lead through a predefined journey. Sequences help sales teams stay organized, follow up consistently and close more deals without missing opportunities. They are ideal for SDRs managing high lead volumes and account executives nurturing prospects.
You’ll need to have a ChartMogul CRM seat and connected email account to create, manage and use sequences. Learn more about roles and permissions.
Here’s what we cover in this article:
- How sequences work
- Best practices for effective sequences
- Before you begin
- Creating a sequence
- Managing sequences
- Starting a sequence
- Editing an active sequence
- Stopping a sequence
How sequences work
A sequence is a series of automated emails and tasks. You start each sequence for a particular contact from their customer profile.
The team member who starts a sequence is the sender of all emails and the assignee of all tasks within the sequence.
Once started, a sequence runs only on weekdays. You specify the time range for sending emails when creating a sequence. ChartMogul sends emails at a random time within the specified range.
ChartMogul pauses sequences for out-of-office replies until the return date (or for seven days when no date is specified).
When the current step is a task, ChartMogul pauses the sequence until the task is completed.
ChartMogul stops a sequence after all steps are executed or the contact replies to an email (in the sequence or any other thread). If you’re using Subscription Analytics, you can set the sequence to stop once the lead becomes an Active Subscriber.
When a sequence stops, ChartMogul adds an event to the customer profile activity feed.

Sequences are designed for personalized 1:1 outreach, not bulk campaigns. Avoid enrolling 100 or more contacts at once—sending high volumes of 1:1 emails in a short period can trigger your email provider’s spam protections and may result in restrictions on your account. For larger outreach, enroll contacts in batches of 20 and stagger each batch by at least 30 minutes. To send marketing communications to a large audience, use a dedicated email marketing tool instead.
Best practices for effective sequences
- Personalize email templates using placeholders with fallbacks.
- Keep follow-up intervals at least 2–3 days between steps.
- Use a mix of emails and manual tasks for human engagement.
- Regularly review and optimize sequences based on performance.
Before you begin
To send emails in a sequence, connect your email account.
Creating a sequence
To create a sequence:
-
Go to Settings & Data > Manage > Sequences and select ADD SEQUENCE.
-
Name your sequence.
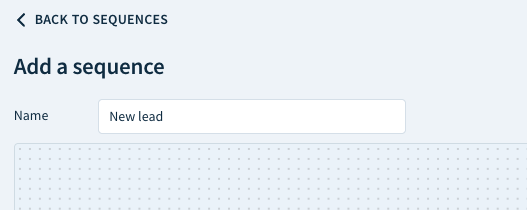
- Add steps.
- Configure settings.
-
Click SAVE to create the sequence. ChartMogul will prompt you if you leave the page before saving.


Navigate to a customer profile to start the sequence.
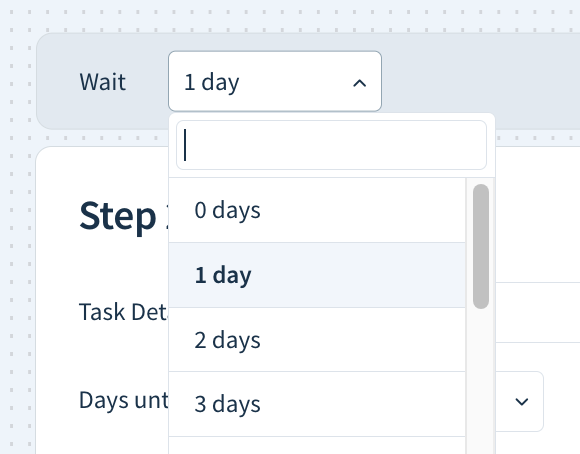
Adding steps
To add a step to your sequence:
-
Select an icon next to Add Step to add an email (envelope) or a task (checkmark).

-
For all steps except the first, select the number of days to Wait before triggering the step.
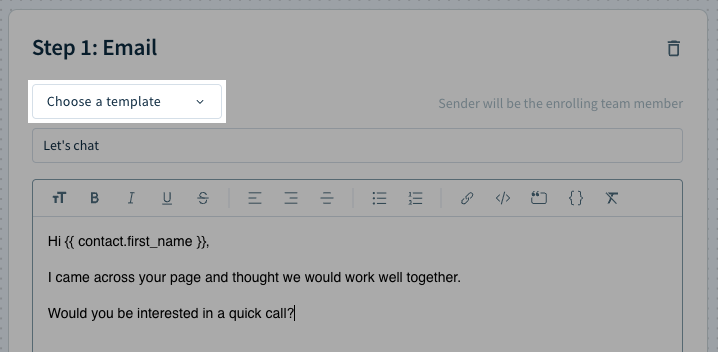
- For each email:
- Enter the subject.
-
Choose an existing email template from the drop-down or write your message using rich formatting tools and placeholders.
- For each task, enter the following:
- Description — A concise description of the task.
- Days until due — Select the number of days to complete the task.
-
Due time — The time when the task is due, in the time zone of the team member who starts the sequence.


To remove a step, select the trashcan icon.

Configuring settings
To configure your sequence:
-
Select the cog icon.

- Set the following:
- Send emails between — Specify the time range for sending emails in the recipient’s time zone. You select the time zone when starting a sequence.
- Send emails as a thread — Enable this option to keep all emails in a single conversation.
- Stop when the lead becomes an active subscriber — Enable this option to stop the sequence when the lead buys a subscription.
- Stop when any contact sends an email — Enable this option to stop the sequence when you receive an email from any contact associated with this customer (not just the one enrolled in the sequence).
-

- Close the modal and SAVE the sequence to apply your settings.

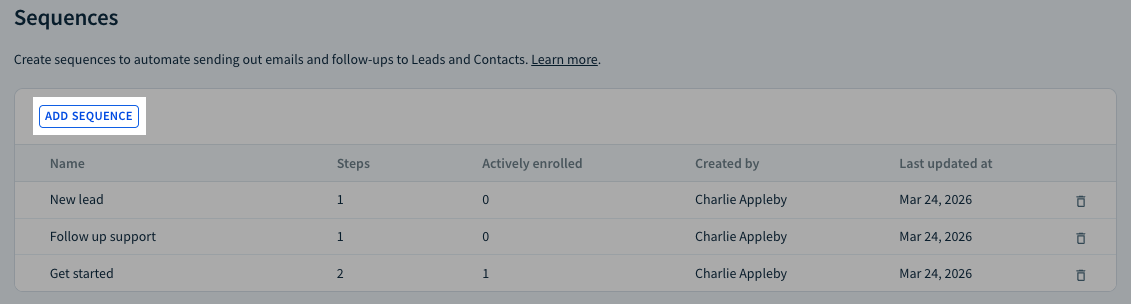
Managing sequences
Access your sequences from Settings & Data > Manage > Sequences.
To edit a sequence, select it from the list. Add, remove or edit steps and configure settings. Click Save to apply your changes.
To permanently delete a sequence, select the trashcan icon and confirm by clicking OK.

Starting a sequence
To start a sequence for a contact:
- Go to a lead’s customer profile.
-
Under Contacts, select the dots icon next to a contact and choose Enroll in a sequence.

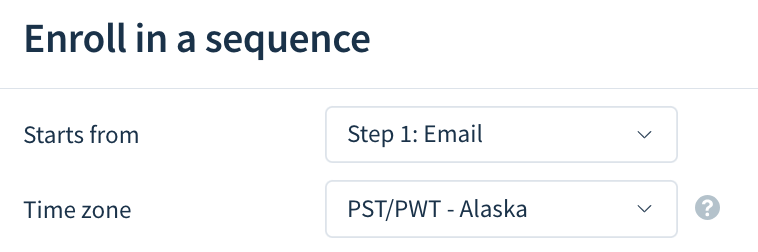
- Select a sequence from the drop-down and click NEXT.
- Use the drop-downs to configure your sequence:
- Starts from — Select the initial step of the sequence.
-
Time zone — The recipient’s time zone. The setting affects the time range for sending emails but not the due times for tasks. When the recipient’s time zone is unavailable, ChartMogul uses the team member’s time zone.
-
Choose to run the first step (Send an email or Create a task) now or later. If you decide to trigger the step later, set a date and time.
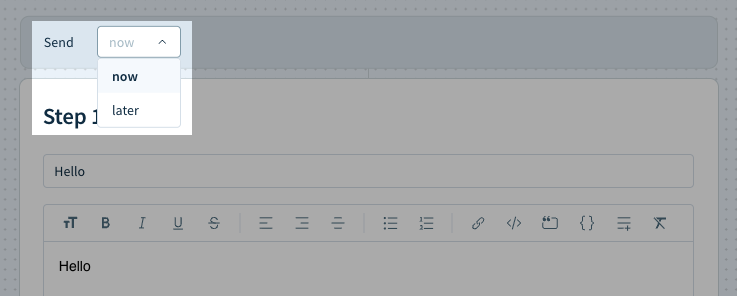
This setting overrides the timeframe for sending emails specified when creating the sequence or the rule to send emails only on weekdays. - If needed, adjust the Wait time for subsequent steps.
- Modify any other settings and the content of your tasks and emails.
-
Click ENROLL to start the sequence for the contact.


All ongoing sequences are visible in the Active Sequences section of a customer profile.

Editing an active sequence
To edit the steps of an active sequence:
- Go to a customer profile.
- Under Active Sequences, find the sequence to edit.
- Hover over the sequence and select the pen icon.
- Click the pen icon next to a scheduled step to adjust the execution time.
- Edit any steps. For example, change the wording of an email or adjust the details of a task.
- Click SAVE to apply your changes.
Stopping a sequence
To stop a sequence:
- Go to the contact’s customer profile.
- Under Active Sequences, find the sequence you want to stop.
-
Select the dots icon and choose Unenroll from sequence.
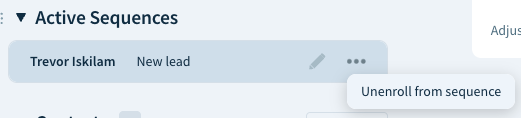
- Click OK to confirm.

Next steps
- Create automated workflows with automations.
- Track customer interactions with notes and call logs.