
Connecting and sending email
You'll need to have a CRM seat to use email. When using ChartMogul CRM with a free seat, ChartMogul adds "Sent from ChartMogul" to emails sent using the app interface. To remove this, upgrade to CRM Pro.
Connecting your email account to ChartMogul lets you send and receive emails in-app while automatically logging sales-related conversations with new and existing customers. All synced emails appear in the customer profile, making it easy for teammates to access conversation history and respond to urgent queries when needed.
Watch a video about communicating with prospects and customers. Data Platform is now called Settings.
Here’s what we cover in this article:
- How it works
- Connecting your email account
- Automatic contact creation
- Adding an email signature
- Composing an email
- Working with email templates
- Using email template placeholders
- Working with the blocklist
- Working with email drafts
- Deleting an email
- Disconnecting your email account
Before you begin
Ensure contacts with email addresses are being imported into your account. ChartMogul uses this information to import and sync emails. Learn more in our ChartMogul CRM setup guide.
How it works
When a team member connects their email, ChartMogul imports emails from their account, matching them with contacts (based on their email address). After the initial import has concluded, ChartMogul will automatically sync any new emails and display them on the relevant customer profiles.
There are also several additional details you should understand and consider when using email with ChartMogul.
| Detail | Impact |
|---|---|
| Update frequency | ChartMogul imports emails in near real-time. |
| Using CC | ChartMogul imports emails when contacts are CC’d on emails. |
| Using BCC | ChartMogul cannot import emails when contacts are only BCC’d. |
| Duplicate contacts in customer records | ChartMogul displays emails for all customer records where the contact is added. |
| Sending an email to multiple contacts | When an email is sent to multiple contacts, ChartMogul displays it for all customer records where the contact is added. |
| Emailing another team member in your ChartMogul account (internal communication) | ChartMogul does not import emails sent between team members in the same ChartMogul account. |
| Emailing another team member in your organization (internal communication) |
ChartMogul does not import emails for team members with the same internal domain. For example, if your email is |
| Deleting a contact | When a contact is deleted, ChartMogul deletes their emails stored in ChartMogul. This doesn’t impact your email inbox. |
| Deleting emails | ChartMogul lets you delete individual emails while keeping them in your email account. You also have the option to add email addresses to the blocklist. |
| Deactivating a ChartMogul team member | ChartMogul retains a team member’s emails after they are deactivated. |
Connecting your email account
To connect your email account to ChartMogul:
- If you’re connecting a Google or Microsoft account, sign in to the account.
- Navigate to Profile > View Profile > Connect your Email.
- Select one of the following:
- Sign in with Google — to connect a Google (Gmail) account
- Sign in with Microsoft — to connect a Microsoft (Outlook) account
- CONNECT WITH IMAP — to connect any email account that supports the Internet Message Access Protocol (IMAP)

If you’re using Google email:
- Click Continue to authorize ChartMogul to access your Gmail account.
-
Check Select all to allow ChartMogul to view your email messages and settings and send email on your behalf.
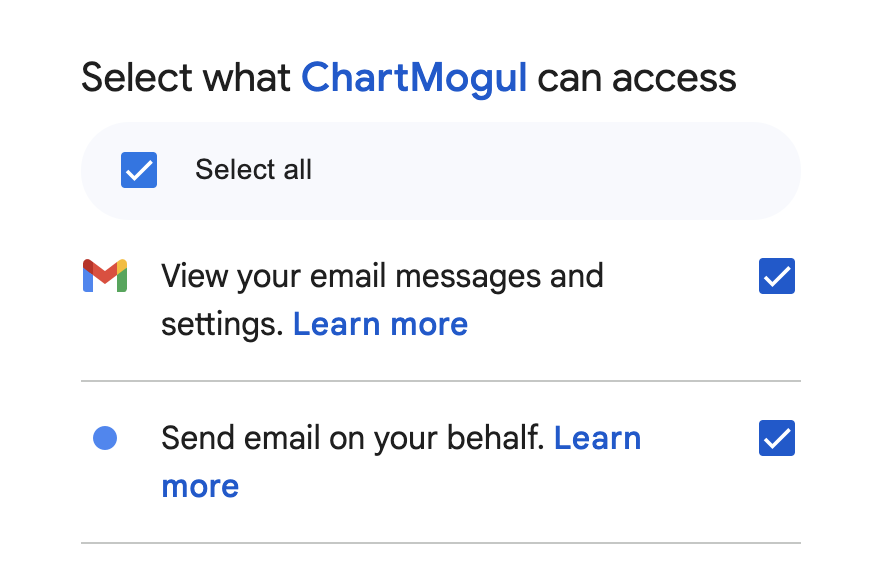
- Click Continue.
If you’re using Microsoft email, click Accept to authorize ChartMogul to access your email, Microsoft profile, maintain your data and send emails on your behalf.

If you’re using IMAP:
- Enter your Email Address, Password and Username.
- Enter IMAP information for incoming mail:
- IMAP Host — The server address where your incoming emails are stored (e.g.,
imap.mail.yahoo.com) - IMAP Port — The port number used to connect to the IMAP server (usually
993for secure or143for non-secure connections)
- IMAP Host — The server address where your incoming emails are stored (e.g.,
- Enter SMTP information for outgoing mail:
- SMTP Host — The server address used to send emails (e.g.,
smtp.mail.yahoo.com) - SMTP Port — The port number for sending emails (usually
465for SSL,587for TLS or25for non-secure connections)
- SMTP Host — The server address used to send emails (e.g.,
- Select SSL required if your mail server requires a secure connection using SSL (Secure Sockets Layer) or TLS (Transport Layer Security) encryption.
- Click CONNECT.
Look for the above details in your email provider documentation.

Automatic contact creation
Once your email account is connected and conversations for existing contacts are imported, ChartMogul scans your emails for addresses to create new contacts.
The search is limited to Working Leads, Qualified Leads, Active Subscribers, Past-due Subscribers and Cancelled Subscribers. ChartMogul skips New Leads and Unqualified Leads when looking for contacts.
ChartMogul keeps the automatically created contacts in a separate source, “Contacts from connected email accounts.” The source is created when you first connect your email account. To view the source, go to Data & Settings > Sources.
ChartMogul adds contacts from this source to existing customer records that have a matching domain in the Website field. If multiple customers have the same domain, ChartMogul adds contacts to all these customer records with qualifying statuses.
It’s not possible to delete the “Contacts from connected email accounts” source.
To stop importing contacts from your email account and remove them from ChartMogul:
- Go to Data & Settings > Sources.
- Click the gear icon next to the “Contacts from connected email accounts” source.
-
Disable the Import contacts from connected email accounts toggle.
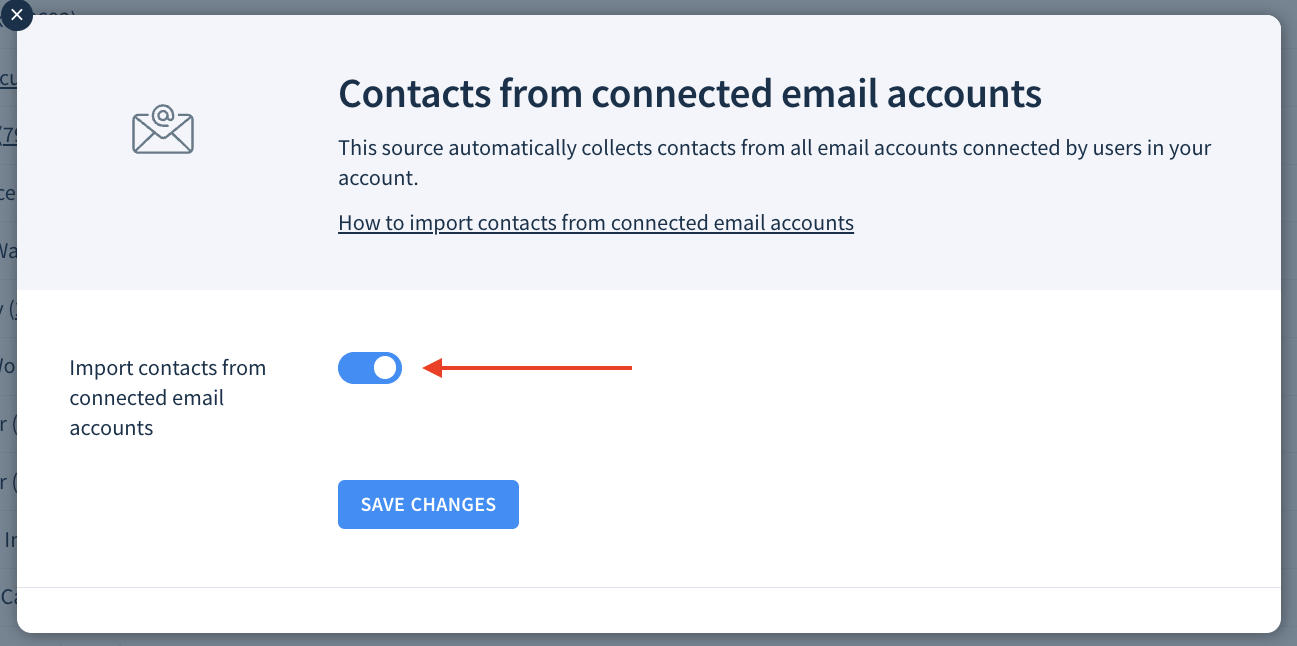
- Click SAVE CHANGES.

Adding an email signature
Create a signature that ChartMogul will append to your emails:
-
Go to Profile > View Profile > Email Signature.

- Use any of the following methods to enter your signature content:
- Write your signature from scratch using the rich formatting tools provided.
-
Copy and paste your existing HTML-based signature. ChartMogul retains any images and links.

-
Select Edit as HTML, paste the HTML code of your signature into the dialog and confirm by clicking APPLY.

- Click SAVE to apply your edits.

Composing an email
Send emails to contacts using the app interface. Each company in ChartMogul is a customer and a customer record includes multiple contacts.
- Navigate to a customer profile and select the Activity tab.
- Click the Email icon above the list of activities or next to a contact.
- Enter the contact(s) in the To field. If the customer has no contacts, click Add contact, fill in the details and click SAVE.
- Add the email address for any additional recipients in the CC or BCC field.
- Enter a subject line.
- Compose your email, including any rich formatting tools, placeholders and text blocks you wish to use or select Choose a template.
- Click the paperclip to attach a file.
- Click the image icon to insert an image.
Finally, click SEND.

Working with email templates
Save time and ensure consistent messaging for emails you send frequently by creating a template.
Creating an email template
- Navigate to Settings > Manage > Email Templates.
- Click Add Template.
- Give your template a unique name in the Template name field.
- Compose the body of your email, including any rich formatting tools and placeholders you wish to use.
- Click SAVE.

ChartMogul creates the template and adds it to the Choose a template drop-down when composing an email.
Editing an email template
- Navigate to Settings > Manage > Email Templates.
- Click the template you want to edit and make any changes as needed.
- Click SAVE.
Deleting an email template
This action is permanent and cannot be undone.
- Navigate to Settings > Manage > Email Templates.
- Click a template you no longer need.
- Click DELETE.
Using email template placeholders
Placeholders allow you to dynamically insert team member, customer and contact data stored in ChartMogul into your emails and email templates. Once you’ve added a placeholder, ChartMogul populates email drafts with data from your account. Learn more.
Working with the blocklist
Add email addresses and domains to your blocklist to prevent ChartMogul from importing unwanted emails to customer records. For example, spam accounts, individuals who requested not to contact them or your competitors’ domains.
Here’s a detailed explanation of how the blocklist works:
| Detail | Impact |
|---|---|
| Emails to or from blocklisted contacts | ChartMogul does not import emails sent to or received from contacts on your blocklist. These include emails with blocked recipients in the CC and BCC fields. Such emails are still visible in your email account. |
| Email threads containing blocklisted contacts | When a blocklisted contact is included in an email thread, ChartMogul does not import emails that include the blocklisted contact. Only emails in a thread sent to or received from permitted contacts are imported. |
| Internal communication | By default, ChartMogul does not import internal email conversations and does not import one-to-one communication between team members. |
| Emailing blocklisted contacts from ChartMogul | It’s possible (though not recommended) to send an email from ChartMogul to a blocklisted contact. Such an email won’t appear in ChartMogul, but you’ll find it in the Sent folder of your email account. |
Adding a blocklist item
- Navigate to Settings > Manage > Email Blocklist.
- Click ADD A BLOCKLIST ITEM.
- Enter the Name for the contact you need to block.
- In the Email field, enter an email address (mary@myriapodlabs.com) or domain (myriapodlabs.com).
- Click SAVE.

ChartMogul deletes the contact’s email history and will no longer import emails from the blocklisted address.
When an email is skipped from import because of a blocklisted recipient, ChartMogul displays a message in the customer profile feed.

Removing a blocklist item
- Navigate to Settings > Manage > Email Blocklist.
- Locate the contact you need to unblock and click Unblock.
ChartMogul imports the contact’s email history and will update automatically with any new emails.
Working with email drafts
Save an email draft to return to it at a later time. ChartMogul saves the changes of the last team member who edits the draft. When drafts are sent, ChartMogul specifies the sender as the team member who sends the email.
Creating an email draft
- Navigate to a customer profile.
- Click the Email icon.
- Compose your email. The draft is saved automatically as you type.
Discarding an email draft
This action is permanent and cannot be undone.
- Navigate to a customer profile.
- Locate the draft.
- Click the Delete icon.
Deleting an email
This action is permanent and cannot be undone. Only Admins and Owners with a CRM seat can delete emails.
To delete an email from a thread, click the Delete icon and confirm by clicking OK.

ChartMogul leaves a message in the customer profile feed that the email has been deleted.

The email won’t appear in future replies within the thread. It will be deleted in ChartMogul but preserved in your email account. Re-syncing the source or reconnecting your account won’t restore the message.
Disconnecting your email account
Disconnect your email account to stop ChartMogul from importing new emails.
- Navigate to Profile > View Profile > Connect your Email.
- Click Disconnect Email Account.
Next steps
- When a lead is qualified, create an opportunity to begin the sales process.
- Add additional data points to contacts and opportunities using custom attributes.